This is going to make you LOVE PowerSchool!
I was so excited when my wonderful data manager at Lake Myra Elementary School showed me how to create and save a group of children in PowerSchool and I couldn't wait to share this with everyone I know!
This opens up so many great possibilities and I think there is a light at the end of the PowerSchool tunnel! Creating groups is hopefully just the beginning of the potential this database has to make our work easier instead of creating seemingly endless frustration.
This opens up so many great possibilities and I think there is a light at the end of the PowerSchool tunnel! Creating groups is hopefully just the beginning of the potential this database has to make our work easier instead of creating seemingly endless frustration.
So how can this help me as a School Social Worker?
Data managers already use some of these features to print letters, labels, and attendance summaries. There are many other great uses for Social Workers.Here are a few ideas:
- Save your PLT list for each school
- Run attendance reports on your saved PLT list
- Print attendance summaries for your PLT list
- Save a list of students in an attendance group and run reports on them
- Save a list of students on an "attendance watch list"
- Whatever you want! (within reason)
I'll be posting a few more tutorials on what to do with your list once you have created it. Subscribe to this blog and you'll get the info first!
Creating your group: A step by step guide
 1. Click this icon to get to the home page.
2. Select the school you want to work with from the drop down list.
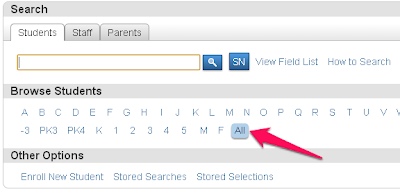
3. Click the "all" button at the end of the alphabetical list.
4. Choose "Select Students By Hand" from the drop down list.
5. Now add students to your list
- Hold Control (Ctrl)
- Click the student you want to add
- Repeat
Make sure that you hold Control before you click each name.
If you don't it will clear out everything you have selected.
6. Choose the bubble "Keep selected students" in the bottom left corner
7. click "Functions"


Can you edit this list once made? And if so, How?
ReplyDeleteThis blog is awesome, Carly! I really appreciate you putting this together for all us to access. All of your information is so concise and easily understandable! =)
ReplyDeleteThe blog is so helpful! I have been to a lot of the trainings but if you don't use some of these functions often, you forget, and the step by step instructions are a great refresher! Thanks for your hard work :)
ReplyDelete